Sunday 27 August 2017

World War I QAIMNS nurse hat


In 2014 I made a World War I QAIMNS nurse uniform, and I’ve worn it a lot since, at several memorable World War I events. My group has, for instance, portrayed a hospital stationed inside a country house, at Museum Huis Doorn.

Now, we’ve added the ‘walking out’ or parade version of the uniform to our repertoire. This means: no apron, no cuffs, a hat instead of a veil, and white gloves.


The hats, naturally, we had to fashion ourselves. Here’s a QAIMNS hat from the collection of the Imperial War Museum, which I used as my main example:

http://www.iwm.org.uk/collections/item/object/30091619

We ordered a number of grey wool felt hats, but they had a pretty weird shape, with a round rather than an oval crown. This made it hard for me to get the hat to fit properly, because the brim would get wavy when I put it on, but some steam pressing did improve it.

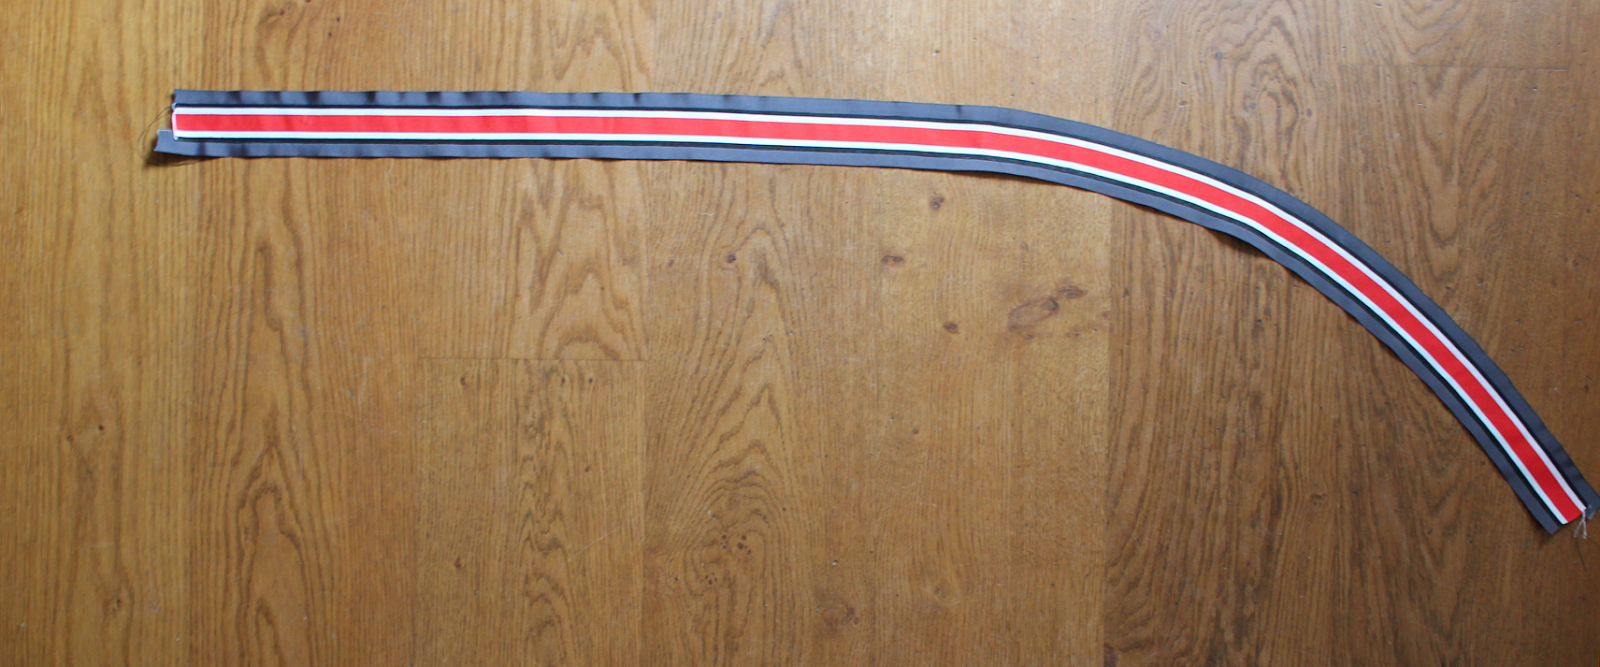
Unfortunately we could not buy the same ribbon that was used at the time. We could have had some made, but only by the roll of 200 metres or so, and we needed about 10. But as the colours were similar to Iron Cross ribbon, we used that, and sewed grey ribbon onto it.
To make the ribbon fit around the crown without all too much puckering, I eased the different ribbons onto each other. First I eased the Iron Cross ribbon onto the top grey ribbon, and then I did the opposite, easing the bottom grey ribbon onto the Iron Cross ribbon. It’s quite amazing how big an effect this had on the shape of the ribbon, as you can see below (the left part of the ribbon was sewn normally, without easing on).


I made the flat bow out of three different pieces of ribbon, since actually tying the ribbon into a bow would have made it bulkier than the bow on the IWM hat.


And here’s the hat sewn up:


We first wore the walking out uniform at the recent Passchendaele event at Zonnebeke in Belgium. It was particularly suitable to wear to the remembrance church service.


Even our hairstyles were uniform here! =)

Saturday 26 August 2017

A 17th century men’s shirt


Pattern: based on the 1659 shirt worn by Claes Bielkenstierna in Janet Arnold’s Patterns of Fashion 4
Fabric: fine white linen
Haberdasheries: 50 cm narrow white tape, two hooks

My husband is ‘chief commander’ of the commemorative battle for the siege of Grol (het beleg van Grol, in Dutch) at Groenlo, meaning he coordinates the battle, and as such, I decided he could no longer do without a proper 17th century shirt. Even though no one sees what he wears underneath his suit.

As I want to be able to attach different styles of collars and cuffs to the shirt, I wanted a very basic shirt, without lace ruffles and the like. So I decided to use pattern 15 from the excellent Patterns of Fashion 4, a ca. 1659 shirt worn by Claes Bielkenstierna. This had the typical characteristics of shirts from the period (also the earlier period, which was necessary as the siege of Grol took place in 1627) but no frills. 
I measured the pattern and found that the circumference of the shirt was 2 metres! I know shirts were very wide in the past, unlike the jackets that went over them, but as my husband’s build is very slim, and pictures of Bielkenstierna showed he was rather rotund, I reckoned I could make my version of the shirt a little narrower. Otherwise I mostly did as the pattern description said. These were the pieces of linen I cut (the photos in this post are pretty terrible; somehow my camera seemed to have trouble with the bright white!):


Dimensions (incl. seam allowances):

1: Body: 85 x 200 cm (cut 1)
2: Sleeves: 60 x 59 cm (cut 2)
3: Sleeve gussets: 14.5 x 14.5 cm (cut 2)
4: Collar: 9 x 43.25 cm (cut 1)
5: Shoulder piece for reinforcement: 7,5 x 20,5 (should have gotten narrower to 4,5 cm at the neck; cut 2)
6: Cuffs: 7 x 23 (cut 2)
7: Bottom side seam gussets: 5 x 5 cm triangles + seam allowance (cut 2)
8: Extra shoulder reinforcement pieces; unused

This is the shirt before I gathered the neckline. The shoulder seam on shirts like these tended to hang off the shoulder, but without gathers, she shoulders would have been very wide!


And after gathering the neckline and attaching the collar and tapes:


I worked a bar reinforcement at the bottom of the front opening. The original shirt had a ‘spider’ reinforcement, which I tried before on an underdress I made for myself, but this is another style that was also used in the period.


The shirt was sewn by machine, with all hemming, topstitching, and the above reinforcement, done by hand.


Through modern eyes, a shirt like this is almost a dress! But the shirt would have been wrapped between the legs before putting on trousers, and used instead of underpants.


The original shirt had tapes at the cuffs as well as at the collar. But I replaced the cuff tapes by hooks and thread loops, because it seemed very inconvenient for my hubby to not be able to close his own cuffs.


I embroidered my hubby’s initials, and a 4 for the fact that this is the fourth shirt I’ve made for him.