Wednesday 31 December 2014

My 2014 projects


Here's an overview of what I made this year! Click on the images to see more about each project.

Historical clothing and accessories


http://misshendrie.blogspot.nl/2014/04/1940s-blouse.html

http://misshendrie.blogspot.nl/2014/04/sew-for-victory-project-finished.html

http://misshendrie.blogspot.nl/2014/06/post-edwardian-long-line-corset.html

http://misshendrie.blogspot.nl/2014/06/1940s-suspender-belt.html

http://misshendrie.blogspot.nl/2014/06/spats-for-american-duchess-boots.html


http://misshendrie.blogspot.nl/2014/07/light-blue-1940s-blouse.html


http://misshendrie.blogspot.nl/2014/07/world-war-i-qaimns-reserve-nurse-uniform.html


http://misshendrie.blogspot.nl/2014/10/edwardian-combinations.html

http://misshendrie.blogspot.nl/2014/11/pair-of-pockets.html

http://misshendrie.blogspot.nl/2014/12/green-linen-regency-dress.html

http://misshendrie.blogspot.nl/2014/12/1940s-jacket.html

Historical knitting projects

http://www.ravelry.com/projects/misshendrie/widdershins-5


Contemporary clothing


http://misshendrie.blogspot.nl/2014/08/jeans.html

Contemporary knitting projects

http://www.ravelry.com/projects/misshendrie/hot-water-platypus

http://www.ravelry.com/projects/misshendrie/edene

Interior

http://misshendrie.blogspot.nl/2014/01/ruffled-curtains-20.html

Amigurumi

http://www.ravelry.com/projects/misshendrie/hearts-2

http://www.ravelry.com/projects/misshendrie/poof-pygmy-puff

http://www.ravelry.com/projects/misshendrie/the-gabu
 
Thanks for visiting my blog
and
happy new year everyone!

Sunday 28 December 2014

1940s jacket


Pattern: vintage Simplicity 4915 from 1943
Fabric: satin cotton, some stash fabric for interfacing, and acetate for lining
Haberdasheries: four buttons

This is a jacket to go with my skirt. The skirt was my first 1940s garment, and the first I based on an original pattern from the period. It fit well, so I was expecting the same for the jacket.

According to the measurements table, size 14 should be slightly smaller than my size, but without alterations the jacket would have been rather wide. I was once inclined to think that if an original pattern is on the loose side, that must be how they did things back then, but when you look at photos of ladies from the 1940s, their jackets are very fitted at the waist, and certainly not baggy. So I took out about 10 centimetres at the waist (and some at the chest, I believe), and also a couple from the sleeves, to make the jacket fit more nicely. Also, I left off the welt pockets. I tried them out, but didn’t like the look of them, so I went for pocket flaps at the lower front only.


I had too little fabric! I don’t know how that is possible, as I bought it for this project and always intended to make the entire suit, and I’m pretty sure I asked the person in the shop how much they thought I needed. Perhaps I didn’t take the shine in the fabric into account, which meant I had to cut all the pieces one way. In any case, I had to piece the front facings of the jacket.

I’ll post some nicer photos when I’ve worn the jacket to an event!

Tuesday 16 December 2014

Green linen Regency dress


Pattern: improvised
Fabric: green linen, white cotton/linen mix for lining
Haberdasheries: some narrow white cotton band, green wool to make loops on the back

After all that officers’ stuff I really felt like making something for myself again! For last year’s Waterloo re-enactment I made a new chemise and a less chic Regency dress. But I, er, started making this dress the Wednesday before the event, and only had time to finish it provisionally. Now it’s really finished, so here it is! Yes, I did iron it. I think I need to get a better iron…


I intentionally made the dress quite short. Working class dresses and skirts were often shorter because they needed to be practical, and also, I like it if my underskirts are visible beneath the dress.

The dress bodice closes at the centre front with cotton bands, and the skirt is then placed over it with an apron construction, the apron band going through four worked loops and tying at the back. Here’s a detail of the back, and the inside of the bodice:


And this is me wearing the dress at an event, with another camp follower:

Thursday 27 November 2014

Pair of pockets


Pattern: Patterns of Fashion 1 (c. 1660-1860) by Janet Arnold
Fabric: printed cotton, plain cotton
Haberdasheries: 3.5 m petersham ribbon, 16 mm wide


A rather peculiar accessory to modern eyes, pockets or hanging pockets were worn underneath women’s clothes from the 17th through the 19th century, as their dresses did not contain pockets like modern clothes do. The dresses often have their opening on the side, and the pockets could be reached through it.


I had been planning to make a pair of pockets for a while, when I found there is a pattern for them in Patterns of Fashion 1. Of course they are easy enough to improvise, but using a pattern is easier still! The pattern is for a very large pair, though, so instead of enlarging it using inch blocks, I just scanned the pattern and printed it so that it would fit an A4 paper. This made the finished pockets 28.5 cm high.


 Pockets were often richly embroidered, but I found it rather a shame to embroider something and then hide it underneath my clothes, so I opted for printed fabric instead; there are plenty of examples of printed cotton pockets from the period as well.
I based the binding with petersham ribbon on these pockets from the V&A.


Monday 20 October 2014

Edwardian combinations


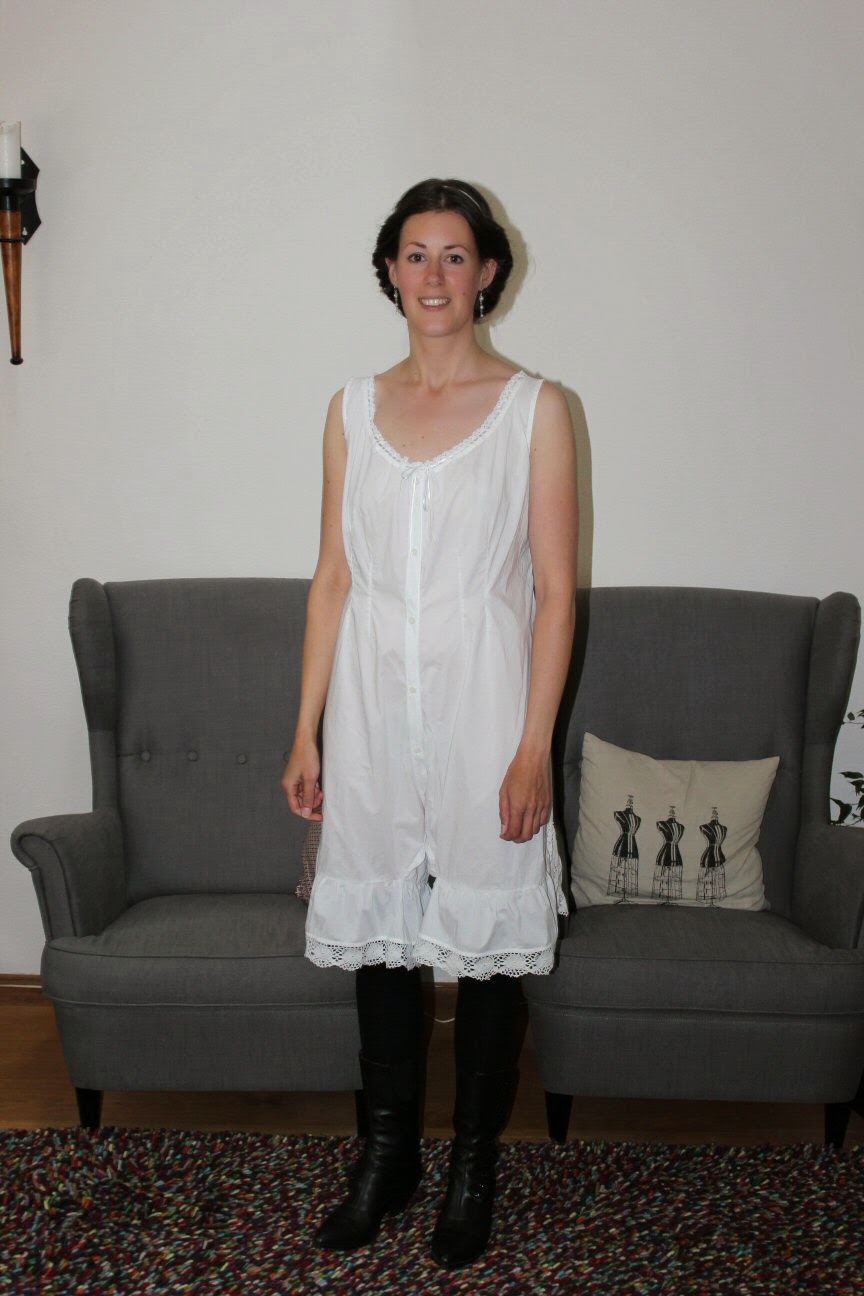
Pattern: from Vintage Lingerie by Jill Salen
Fabric: about 1.7 m fine white cotton, 1.4m wide
Haberdasheries: 10 buttons, 1.5 m 3 mm wide satin ribbon, 1.1 m lace, 2.6 m wide lace

The first step to making these combinations was enlarging the pattern. Most patterns in the book Vintage Lingerie use a 1:1 inch scale, but this one uses a 1:2 inch scale because it’s larger than most of the underwear in the book, such as bras and tap pants. I bought squared pattern paper with 1 cm blocks and thick lines each 5 cm specifically for enlarging patterns in books. I looked for paper with 1 inch blocks first, but strangely, it doesn’t seem to exist. Paper with 1 and 2 cm blocks is readily available from shops where I live, but I’ve never really seen the use of that, and nor would it have served my purpose now. But the 5 cm paper did, because each inch square in the book became one 5 cm square on paper, and that made drawing the pattern quite easy.

Once I had the pattern drawn and cut out, I made a mock-up of one half of the combinations. I expected them to be too small, since I’m quite tall for the period, and did want to make sure I would be able to sit in them. However, the size turned out fine, and the crotch hanging quite low enough, so the only things I changed about the pattern were the front darts, which were originally slightly higher than my waistline, and the scalloped edges at the neckline and on the leg ruffles, which I omitted because I didn’t especially like them, and they would have made it harder to neatly finish the garment.

The c. 1900 original this pattern was taken from, has an open crotch. However, I read in Costume In Detail by Nancy Bradfield that the open crotch style was rare after 1911, so, as I made this to wear underneath my WWI clothing, I decided to make it close with buttons all around the bottom.

I would not recommend this pattern to inexperienced seamstresses, as there are literally NO instructions as to how the garment should be made (apart from two specific projects in the back, none of the patterns have any instructions). On the one hand that was fine with me; this way, at least there weren’t any instructions that were hard for me to understand, as with my Simplicity projects. But some detail photographs, or a photo of what the back of the original looks like, at least, would have been much appreciated!
Nonetheless, I think the finished item is pretty awesome =). Here it is on me:


And here are the combinations worn with my longline corset:


Some close-ups of the lace on the leg ruffles, and how the corset suspenders go through the gaps in the ruffles:


I English seamed the back and side seams, and used self-fabric bias binding to neatly finish the lace attachments. Where fabric was gathered, I finished the inside seams with hand-sewn sort-of French seams: